This article describes a simple way to deploy your application and database. Once the development and testing of application are done, it is necessary to create some script that installs your application to the target computer. In VS2003/2005, it can be done by adding
setup project to your solution and performing build on it. Get more information about setup projects on the MSDN site. But sometimes, the situation is more complicated.
Database
Usually your application has some storage for saving its data. In my example, we are talking about SQL server database. My database is schema (table definitions), stored procedures and some predefined data (like ENUMs, application users and so on, that are stored in database). So as you can see, my
Setup project is not only script that deploys application's binaries to target computer but also contains some logic for finding local SQL server (can be modified to find any SQL server in local network), creating database and inserting all predefined application data. The following steps will describe how it can be done.
Step 1
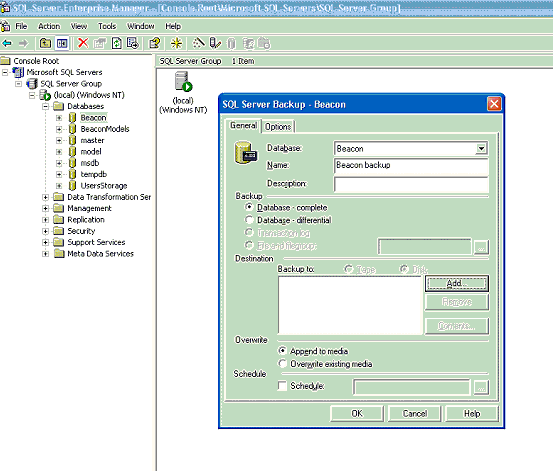
Perform backup operation on your database. It can be done in SQL EM. Choose your database, perform right click and choose backup database. See
picture 1:

Picture 1
After choosing backup database, in SQL Server backup form, click
add button and choose backup file name. (In my example, I called it
dbBackup.) See
picture 2.

Picture 2
Finally, click OK button and Backup will be executed. The created file will contain your database information.
Step 2
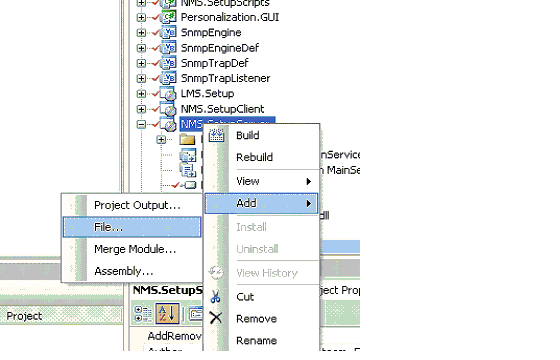
Now add your file to your Setup project. Perform Right click on setup project in (Visual Studio). See
Picture 3:

Picture 3
In file dialog, choose
dbBackUp file and perform build. Now your
msi contains
dbBackupFile, that will be copied to the target directory during setup process.
Step 3
Create a new project (
SetupScripts) that will contain your deployment logic. Add a new class that inherits from
System.Configuration.Install.Installer (Installer class in Add New Item dialog) and perform override on
Install method. In Step 5, I'll give more explanation about the
Install method. Compile your project.
Step 4
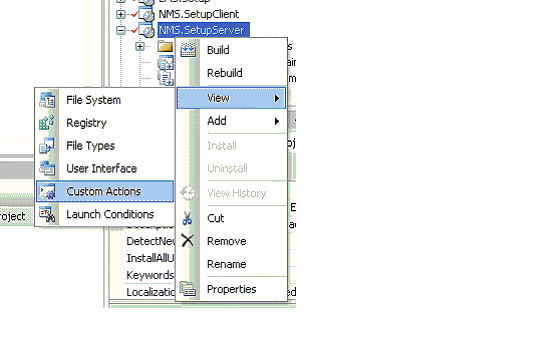
Now perform right mouse click on your setup project and click Custom actions. See
picture 4.

Picture 4
In custom actions screen, click on install folder and add
SetupScripts.dll from the previous step. Now during install, your
SetupScript.dll will be used, so if it contains a class that inherits from Installer (as we've done in step 3), the Installer's class
Install method will be invoked. You can pass parameters to your
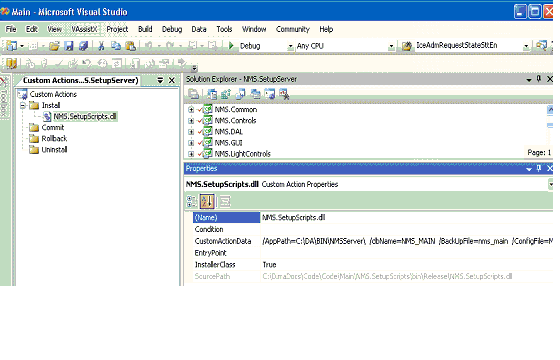
installmethod by performing the following steps: Right mouse click on
SetupScripts.dll in Custom actions -> Install folder. Go to properties window and add parameters to
CustomActionData row. See
picture 5.

Picture 5
Step 5
Finally, we can add code that installs the database.
 Collapse | Copy Code
public override void Install(System.Collections.IDictionary stateSaver)
{
try
{
base.Install( stateSaver );
SetupDataBase db = new SetupDataBase();
db.DbName = Context.Parameters["dbName"];
log.WriteLine( "Database name: " + db.DbName );
db.BackUpFilePath = Context.Parameters["BackUpFile"];
log.WriteLine( "Backup file: " + db.BackUpFilePath );
db.AppConfigFileName = Context.Parameters["ConfigFile"];
log.WriteLine( "Config file: " + db.AppConfigFileName );
db.AppPath = Context.Parameters["AppPath"];
log.WriteLine( "AppPath: " + db.AppPath );
db.m_datFilePath = Context.Parameters["DATFile"];
log.WriteLine( "DATFile: " + db.m_datFilePath );
db.Execute();
}
catch( Exception e )
{
throw new ApplicationException("Database creation fault: \n" + e.Message );
}
}
Setup database is a class that performs database install. (You can find its full code in the attached ZIP file). Now I'll show only its execute and
GetConnStringToLocalServer() methods.
 Collapse | Copy Code
public void Execute()
{
SqlCommand cmd = null;
SqlConnection conn = null;
try
{
string connString = GetConnStringToLocalServer();
conn = new SqlConnection( connString );
string query = string.Format(
@"restore database {1} from disk='{2}{0}'",
m_backUpFilePath,
m_dbName,
m_datFilePath );
cmd = new SqlCommand( query, conn );
cmd.CommandType = CommandType.Text;
conn.Open();
cmd.ExecuteNonQuery();
string[] parts = connString.Split( new char[] { ';' } );
foreach( string part in parts )
{
if( part.StartsWith( "Initial" ) )
{
connString = connString.Replace(
part,
string.Format( "Initial Catalog={0}", m_dbName)
);
}
}
UpdateAttribute( connString );
}
finally
{
if( cmd != null ) cmd.Dispose();
if( conn != null ) conn.Dispose();
}
}
private string GetConnStringToLocalServer()
{
SqlDataSourceEnumerator sqlEnum = SqlDataSourceEnumerator.Instance;
DataTable table = sqlEnum.GetDataSources();
string machineName = Environment.MachineName;
foreach( DataRow row in table.Rows )
{
if( row[0].ToString() == machineName )
{
string connString = string.Format(
"Persist Security Info=False;Integrated Security=SSPI;" +
"Initial Catalog=master;Data Source={0}",
machineName );
return connString;
}
}
throw new ApplicationException( "No local sql Server is installed" );
}
Ok folks, that’s all. May be one more tip, install code is extremely hard to debug, so use logging mechanism to log almost every step of install operation. In the attached code (in ZIP file), I've used regular Windows Form to see the installation progress status. Use this example to create something more elegant.