Introduction
In this article, I give you an example of how you can send SMS messages to wireless devices from C# .NET. I assume, that you are familiar with Visual Studio 2003 or 2005 and the basics of databases and the SQL language. The solution described here is an in-house solution. To use it, you need a GSM Modem for sending SMS messages.
Background
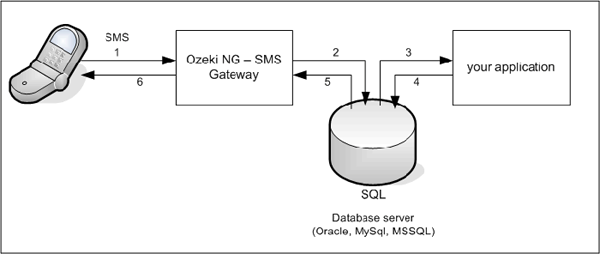
The system architecture used for SMS messaging consists of a GSM Modem, that is attached to the PC with a phone-to-PC datacable, an SQL-SMS Gateway software installed onto your PC, an SQL database server, such as SQL Express or Microsoft SQL and your SMS application (Figure 1). As you can see in the figure, your SMS application will create an SQL record in the database. The SMS gateway will poll this record using an SQL
SELECT statement and will send it using a GSM modem.

Figure 1: In house SMS messaging / system architecture.
Preparing your Database Server
To get this architecture running, first you should prepare your database. This means that you should create two database tables. One will be used for sending SMS messages (
ozekimessageout) and the other will be used for receiving SMS messages (
ozekimessagein). The database table you create should contain a field for sender number, recipient number and message text. For sending messages, you also need a status field, that will indicate whether the message has been sent.
The recommended database table layout can be seen on Figure 2. Please note that you can add extra columns to this layout freely. After creating the database table layout, you should also create a username and a password that can be used to log into database.
 Collapse | Copy Code
create database ozeki
GO

use database ozeki
GO

CREATE TABLE ozekimessagein (
id int IDENTITY (1,1),
sender varchar(30),
receiver varchar(30),
msg varchar(160),
senttime varchar(100),
receivedtime varchar(100),
operator varchar(30),
msgtype varchar(30),
reference varchar(30),
);

CREATE TABLE ozekimessageout (
id int IDENTITY (1,1),
sender varchar(30),
receiver varchar(30),
msg varchar(160),
senttime varchar(100),
receivedtime varchar(100),
operator varchar(100),
msgtype varchar(30),
reference varchar(30),
status varchar(30),
errormsg varchar(250)
);
GO

sp_addLogin 'ozekiuser', 'ozekipass'
GO

sp_addsrvrolemember 'ozekiuser', 'sysadmin'
GO
Figure 2: Database table layout.
Configuring the SMS Gateway
Once the database has been setup, you should install and configure the SMS Gateway. The SMS Gateway we use in this article is the Ozeki NG - SMS Gateway. It can be downloaded from
www.ozekisms.com. There are other similar SMS gateways available. We chose this SMS Gateway, because it is very reliable, easy to configure and it is based on .NET which means it integrates well into our architecture. In the SMS gateway, first you should configure the GSM modem attached to your PC. This can be done by adding a GSM Modem service provider connection. Detailed steps:
Step 1. Open
http://127.0.0.1:9501 in Internet Explorer, login with admin/abc123.
Step 2. In the "Serviceprovider connections" menu, click on "Add service provider connection", then select "GSM Modem Connection" and click "Install".
Step 3. On the GSM modem configuration form, select the com port (usually COM1) and click on autodetect to configure your modem.
Step 4. In the "Users and applications" menu, click on "Add user", the select "Database user" and click on "install".
Step 5. For username, provide "sql1".
Step 6. For connection string, type select "OleDb" and for connection string enter:
 Collapse | Copy Code
Provider=SQLNCLI;Server=.\SQLEXPRESS;User ID=ozekiuser;password=ozekipass;
Database=ozeki;Persist Security Info=True
Step 7. In the configuration form, I suggest you to turn on SQL logging. You can do this by enabling the checkboxes:
 Collapse | Copy Code
"Log SQL SELECT statements" and "Log SQL UPDATE statements"

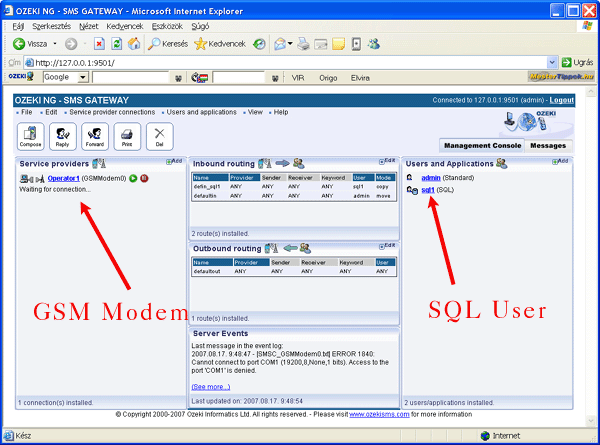
Figure 3: SMS Gateway configured.
After these steps, you have configured the SMS Gateway to forward your messages from the database to the mobile devices.
Using the Code
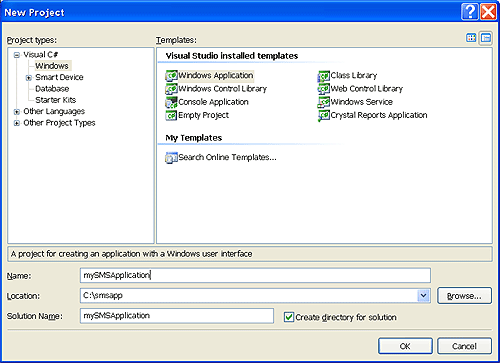
Once the database has been prepared and the SMS Gateway has been setup, you can use Visual Studio .NET to create your SMS application. In Visual Studio, create a new project of "Windows Application" type (Figure 4). This application will provide a GUI for sending the SMS message. It will connect to the database server and will insert a new record when a message is sent to a mobile phone.

Figure 4: Application type: Windows Application.
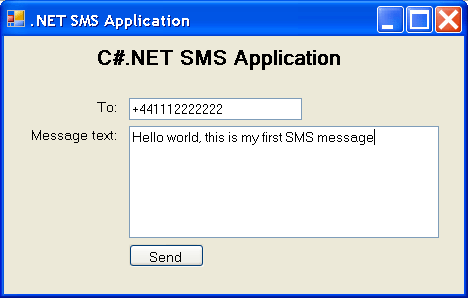
In this application, you should have a form that can be used by the user of your app to compose the message (Figure 5). This form should contain a field for the recipient number and another field for the message text. The form will have a button, that will initiate the sending process.

Figure 5: SMS Message form.
To be able to connect to your database server, you should include the "
using System.Data.OleDb;" directive in the
using section for your code. The code for sending the SMS message is written into the event handler of the button. In this code, first we connect to the database using an
OleDbConnection object. For the connection, we use a standard connection string. If the connection is successful (the
state equals
ConnectionState.Open), we execute our SQL
INSERT statement to insert the SMS message. To achieve this, we compose the SQL statement and we use an
OleDbCommand object to execute it (Figure 6):
 Collapse | Copy Code
private void button1_Click(object sender, EventArgs e)
{
try
{
OleDbConnection conn = new OleDbConnection();
conn.ConnectionString = "Provider=SQLNCLI;Server=.\\;"+
"User ID=ozekiuser;password=ozekipass;Database=ozeki;Persist Security Info=True";
conn.Open();
if (conn.State == ConnectionState.Open)
{
OleDbCommand cmd = new OleDbCommand();
cmd.Connection = conn;
string SQLInsert =
"INSERT INTO "+
"ozekimessageout (receiver,msg,status) "+
"VALUES "+
"('"+tbSender.Text+"','"+tbMsg.Text+"','send')";
cmd.CommandText = SQLInsert;
cmd.ExecuteNonQuery();
MessageBox.Show("Message sent");
}
conn.Close();
}
catch (Exception ex)
{
MessageBox.Show(ex.Message);
}
}
Verifying Your SMS Application
After executing the application, you can send your first SMS message. To track the message, you can use a SQL console to see what is inserted into your SQL table and you should examine the event log of the SMS gateway to see the SQL events. The eventlog of the Ozeki NG SMS gateway is located at the following location:
 Collapse | Copy Code
C:\Program Files\Ozeki\OzekiNG - SMS Gateway\Logs
References
Good luck
!